Saturday, March 28, 2009

Sweeping Up After A Dragon

After last week's little tirade on the sad state of the craft market, I came back to my dragon raring to go. With all the major carving completed on the front of the spoon, this week is all about sweeping up any obvious inconsistancies, errors or annoyances which still remain.

Most of these lurk in the cutouts of the Celtic knotwork and the vines.

To deal with fuzzing of the wood, scruffy saw cuts or knicks and blemishes, I make use of needle files. These remarkable little files allow me to polish up rough areas without involving sandpapers. I find that the file (whether full sized or in needle form) saves me a ton of money on abrasive papers and even more time not having to fold up the sandpaper into odd shapes. They also have the great bonus of not leaving sanding grit behind in the wood and dulling my tools should I need to revist the area witht the knives. I don't spend a great deal of time with the filing as I will be turning the spoon over soon and working from the other side, so there will be a final opportunity for tune-ups later.

It IS however, a bit of a morale boost to have the front almost finished and to not have jobs hanging over my head before I go to work on the back.


Inevitably there are little areas which could benefit from a touch more knife work. Every time I turn around it seems like there is some aspect of this star which could be improved. I'll try to get as much as I can done now, but I anticipate spotting more on my last sweep when the whole spoon is complete. For now I go over the spoon with a nice little customized Flex cut pelican mini knife. For those of you with an interest in tools, to customize a pelican knife just like mine, simply drop it on a concrete floor while talking to some door-to-door type soliciting a sale. When the tip of the blade breaks off, you are ready to spend time at the grinder carefully trying to reshape things without over- heating the blade and loosing its temper. I should add that keeping the knife's temper is crucial...YOURS however, will be long gone!

The vines could do with a little bit of touching up too. For this I rip a couple of narrow strips of cloth backed abrasive and I then run the strips over the vine as shown in the picture. Running the paper back and forth gives the edges a nice, soft 'roundover' which gives the vines a natural look. I don't ever use anything coarser than about 150 for this process (preferably 180 or 220) so that the scratch marks from the paper going across the grain don't make a mess of things. I'm more concerned with getting the edges neatly rounded than I am about removing material.

Lastly, I give the spoon bowl another light sanding with 220 grit paper. This cleans up any last scratches and also gets rid of any accumulated dirt which has adhered to the spoon during the carving process. I know that sounds as though perhaps I am carving in a farmyard, but you would be surprised at how pencil lines, eraser sweepings, grease from the hands and metal from the tools can conspire to take the sparkle from your work. A light buff at a super fine grit like this will get rid of that stuff and get the wood looking pristine again.

Next week I'm going to flip the spoon over and have some dusty, noisy, dangerous fun with an angle grinder. Who says its all comtemplative quiet in the carving studio?

In the meantime, please consider donating to the Left Coast Eisteddfod! With every week that passes, this exciting event draws nearer and your support becomes more and more vital. I hope you will consider becoming involved in the Eisteddfod as a donor, sponsor, volunteer or ticket holder! And if you know any AIG execs who got the big payouts last week, ask them to send a couple of crumbs our way!


Bookmark and Share

Tuesday, March 24, 2009

Lovespoons in the snow!

I took a break from my regular routine of lovespoon carving this past week and took myself over to Vancouver BC for the big Celtic Fest and St. Patrick's Day parade. Getting ready for an event like this takes a lot of effort and involves adjusting my mindset from fussing over individual commission pieces to quickly carving lots of 'economically' priced spoons for the impulse-buy market. Its not something I like to do all that often. While it is good for me to practice carving at slightly higher intensity than I usually carve, my normal speed is pretty damn quick, so it isn't really that much fun to go even faster. Generally, it means that I am carving simple designs as quickly as I can manage it and not being able to give the subtle details the time I would like.

Never-the-less, the thought of meeting all kinds of interesting people and having a chance to get out of the studio for a couple of days lends some excitement to the proceedings. I get some spoons together, maybe make some earrings or jewelry boxes for the 10 dollar crowd and break out the David Western Lovespoons banner...it's good fun.

Of course once I get there, I am inevitably faced by the customer who tells me that my prices are too high or that they could carve one faster, better, blah, blah, blah. Now normally, I'm pretty good at keeping a poker face, nodding sagely and offering a polite response, but take a look at this weather we had, and you'll see why my mood darkened a touch this week.

The first day was pretty good, but it did start to rain and blow a bit in the afternoon and I started to get pretty chilly. That was when my 'you're too expensive' customer showed up. On a sunny day, she would have got an equally sunny smile, a slight shrug of the shoulders and some sort of non-committal, politically correct, the-customer-is-always-right type of response to her insult. But I was freezing my arse off and frankly I wasn't in the mood for it. My reply was somewhat curt, lightly laced with dripping sarcasm and with a hint of cruelty to give it that certain je ne sais quoi (as the French would say). I very much doubt I'll ever enjoy her custom in the future.

But as the second day rolled along and the snow began filling up my display boxes, I had plenty of time to consider the whole 'expensive craft' issue. How does a craftsperson get through to people who are conditioned to buy the cheapest crap they can lay hands on that the things we make are worth the money we charge? As a lovesoon carver, I'm damned lucky if I ever make 20 bucks an hour carving a commission piece. Now that might sound pretty good if you work at the Arches, but for the amount of knowledge and technical skill I am expected to possess, it's pretty mediocre money. Remember too, that 20 bucks also includes the cost of running my studio, my advertising, wood, tools etc etc., so by the time I get my hands on some, I'd probably be better off financially working for Walmart. So why not charge more? Well, you can only charge what the market will bear and the market doesn't have much time for handmade stuff. It's kind of a funny thing, but I get loads of people coming by the booth to admire my spoons and to bemoan the sad state of affairs in the 'hand-made' world, but hardly any of them support their kind sentiments with a purchase.

Another problem is that there are so many TV shows and 'how-to' books which show you how to make a 'one-of-a-kind heirloom' on a Sunday afternoon during the half- time show of the football game, that alot of craft has been cheapened to the point of irrelevance. I don't mean to belittle those people who have to see a finished project after their 12 minutes of hard work, but sometimes good things really do come to those who wait. Good craft requires patience, skill and more than a little bit of determination. It also requires that you have breakages, disasters and mis-starts along the way. That is all part of getting good at something.

I guess where all this is leading, is if you are one of those people who thinks that the craft product in front of you is too expensive etc., etc., ask yourself if you could really do it better and quicker. Of course you think you could, but could you really? Be honest about it and then ask yourself if you would do the work for that price -- I bet you'll come up with a different view of things.


Well, now that I've got all that off my chest, swept the snow off my spoons and packed them away, I can return to my Americymru spoon and my usual sunny disposition!


Bookmark and Share

Friday, March 13, 2009

On a Wing And a Prayer!

This week the dragon finally gets his wings clipped! He might also have a name fairly soon too.

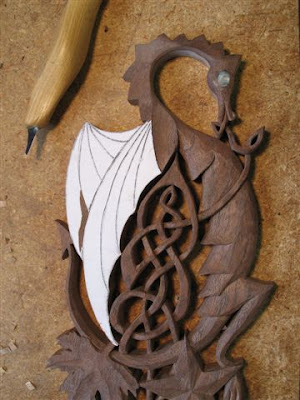
There are a number of ways I can approach the wings in terms of how I shape them. Many times I carve a concave 'dip' between the spine of each wing section to give them a bat-like appearance, but for this spoon I am going to cut in evenly. This will create wedge shaped section which will cast more shadow and have a vaguely art deco feel. I think that with the bold scales running along his back, the bolder and more stylized look of the wedge tapers will work nicely.

To do this, I first cut lines to delineate each section of wing. I do this in several passes until the knife is cutting about 1/16 of an inch deep or so (1.5mm) Be careful to keep the support hand out of the path of the knife blade in case it suddenly slips. Although the picture angle makes it look like my left hand is perilously positioned, it actually is out of the way of the knife blade.

With the lines all cut, I start shaping out the wedge cuts. I start close to the line and take small cuts, gradually deeping and widening as more material is removed. I resist the urge to hack out heaving great chunks as it makes the work a lot harder and increases the risk of a slip or break.

For the first section which is quite small and confined, I make use of my wonderful little bent knife and make yet another shameless plug for tool maker extraordinaire, Mike Komick at Preferred Edge Tools. If you have ever wanted to try out a bent knife, you really can't get better than one of Mike's. I love my bent knives and have used them to replace almost every one of my gouges. Handled carefully, the bent blade can access just about any area of the carving and leaves a nice smooth curve in its wake. Now you might be saying, "I thought Western said he was going to make a flat cut" and you are right!! I'm going to use the bent knife to remove material in the awkward areas and then will go over the results with my straight knife and chisels to get a nice flat surface. If I didn't have a bent knife on hand, I would use the straight knife here, I just wouldn't be able to clear the area as quickly.

Here is a close up showing the wedged-stepped effect I am after. What I want to happen is for each segment to deepen evenly and fairly with no bumps and dips. Its harder than it sounds, especially as the grain changes direction through the curve.


I'm using my straight knife to come back with the grain on this wing section. You can see that the grain changes direction about half way along the section, so I am forced to work from both ends toward the centre if I want to have smooth, tear-free cuts. Going against the grain is not recommended except in direst situations. It inevitably results in torn and ragged cuts as the wood snaps ahead of the blade.
I've often been told that it pays to learn to carve with both hands so that I don't have to keep spinning the work around, but I confess that I have thus far lacked the discipline to teach myself ambidexterity...hell, I can't even spell it!!

The design I am working with will show both the left and right wings of the dragon, so it is important to cut the left wing down in depth to set it off against the right wing. I level this area down about 1/8 to 1/4 of an inch below the right wing section then cut my lines back in. With that done, I proceed in the same manner as with the first wing. When complete, the effect of 'one wing behind the other' should be fairly evident. The meeting of all these lines also makes a nice sculptural image all on its own!

Well, here he is in all his splendor. That means we are almost half way finished. Next week I'll go over some of the rough sections and details I haven't quite finished and tiddle everything up before flipping it over and starting phase 2.

This gives a good idea of how the spoon will look when completed though and it will hopefully convince any 'fence-sitters' who haven't donated a couple of bucks to the Left Coast Eisteddfod that it will be worth it! Time is ticking and the Eisteddfod is coming together! Please help support it!! Come on Tom Jones, Catherine Zeta, Cerys Matthews, Anthony Hopkins etc etc etc...where are you??


Bookmark and Share

Friday, March 6, 2009

Left Coast Eisteddfod Tickets on Sale Tomorrow

Tickets for the Left Coast Eisteddfod, a Welsh Performing Arts Festival go on sale at Ticketmaster.com tomorrow, 7 March 2009 -

The Left Coast Eisteddfod will be held Saturday, 22 August 2009, at McMenamin's Crytal Ballroom in Portland, Oregon. David Western will be there and will give a talk on lovespoons and carving.


Bookmark and Share

Full Steam A Head!!

This week I am going to work on the dragon's head. I hope to get it nicely shaped with a good 'flow'. I don't want it to look particularly ferocious and offputting, but by the same token, I don't want it to look like Barney or something cartooney. I've settled on a fairly neutral mouth with the tongue becoming the start of the Celtic knot, but at the moment I am more interested in shaping a nice form to the head and neck.

As you can see, I have started to rough out the curve of the chest to where it meets the tongue and I have put some shape to the neck by tapering it back a bit. I have also started to shape the face a bit and will adjust the tongue so that the 'overs and unders' of the Celtic knotwork come out properly.

This shows more clearly how I am tapering the neck back to form the three dimensional shape and to find the spinal ridge. I've also started to shape the mouth a bit so that I can form the last bit of knotwork just below the mouth. One thing that I really have to watch at this point is how the wings will join the body at the shoulder region. It's easy to take to much off while shaping the chest and neck and be left with too little material for a nice transitional area to the wings.

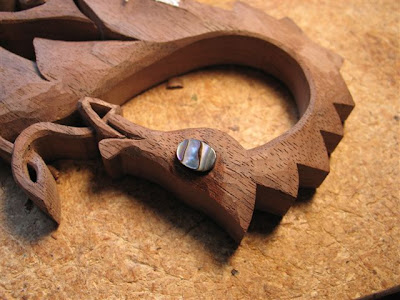
I had originally planned to carve the dragon's eye directly from the walnut and have it be fairly subdued, but he's a dragon not a shrinking violet!! I have now decided that an inlay of abalone shell will give his eyes a brilliant flash when the spoon is viewed from different angles. I don't usually do too much inlay or staining on my spoons, preferring to keep the wood as the focus of attention, but sometimes a judiciously applied inlay can really add a splash of colour and can make a marvelous focal point on a design. To inlay abalone, I shape the piece I want to use then spot glue it to the piece. With the glue cured, I trace around the edge of the inlay with a razor knife then pop the inlay back off. Staying inside the scribed line, I excavate a flat area which is almost the depth of the shell. I like to leave a tiny bit proud of the surface so that I can dome it a bit and shape it flush to the surface. A note on shell inlays: The dust made by sanding or shaping abalone or mother-or-pearl is reputed to be highly carcenogenic. Always wear a dust mask and clean up the dust with a damp cloth if you decide to try some inlaying of your own! The stuff also really stinks, so I generally do mine outside in a breezy area.

With the inlay in and lightly domed (as well as being taken down flush with the surrounding wood), I can concentrate on giving the head and neck some shape.

To get a smooth and fair curve, I use a wood file to do the shaping at this point. I really do try to avoid sanding for as long as possible so that I don't embed sanding grit into the piece and cause damage to my blades should I need to cut more later. Here you can see I've also started to shape up the nostril area and give some form to the knotwork.

Here he is so far. Taking shape and looking fine; as the best class of dragons should! We've been getting some great name suggestions for him and I encourage you to send in your suggestion if you haven't already. Although there's ****all for a prize, you do get the glory of being the one who names him We're going to close off the entries next weekend, so act quickly!! The great folks at Americymru have decided that the democratic way to select the winner is to run a poll of their 5 'best picks' and let you vote on the ultimate winner. In the meantime, I've stopped calling him Dafydd in preparation for the 'people's choice' decision.


Bookmark and Share