Tuesday, October 19, 2010

And the Winner is......

Bookmark and Share

Well, here it is!!! The official announcement from the Left Coast Eisteddfod!
Both Laura and I would like to send our congratulations to Kathy and we hope the lovespoon brings her many, many years of pleasure!
Cheers! Dave and Laura

The winner for the 2010 Left Coast Eisteddfod Lovespoon is Kathy Bushman of Milwaukie, Oregon!


Kathy is an AmeriCymru member and purchased her winning ticket at this year's Night of the Living Bards event in Portland, Oregon. "I've never won anything in my life and this is so beautiful, I can't believe it's mine! Thank you so much and thank you so much to the artists who made this!"


This is the second year for the Left Coast Eisteddfod and the Left Coast Eisteddfod Lovespoon, a custom started by artist David Western of British Columbia, who was joined this year by artist Laura Jenkins-Gorun, of Ohio. David has been a well-known lovespoon carver for many years, his work has been commissioned all over the world and appears in museum collections, including St. Fagans in Wales, he teaches carving and is the author of Fine Art of Carving Lovespoons.


We very gratefully thank David and Laura for their very great contribution to the Left Coast Eisteddfod, for their hard work and their incredible, incomparable art.

This year's spoon:


Read more: http://americymru.ning.com/profiles/blogs/portland-2010-lovespoonand-the?xg_source=activity#ixzz12q6pn2zG

Tuesday, October 5, 2010

2010 Lovespoon Winner To Be Announced at Night of the Living Bards live event

The winner of this year's incredible Left Coast Eisteddfod Lovespoon will be chosen and announced at our live event in Portland, Oregon, "Night of the Living Bards," which will be streamed live, online through the skilled technical magic of Ty Bach Productions
The live event will include the first western hemisphere screening of "Otherworld"; performances by California's premier acoustic Tom Jones cover band, Sex Bomb, and Portland Oregon's zero emissions harpist, Halley Weaver; live poetry and storytelling competitions and appearances by authors Niall Griffiths, Chris Keil, Peter Griffiths and Harrison Solow.
For tickets to the live event, purchase here.
Bards Poster


Bookmark and Share

Tuesday, September 28, 2010

Letting go...

Bookmark and Share

When I finish a spoon and show it to people, they often say "that's a keeper" and they don't understand how I can let go. I have to admit - with other art forms, I have felt that way. But with lovespoons, I never really have. The whole point of a lovespoon is to give it away. Now, I wouldn't mind being given a lovespoon that was created for me, but I have never really regretted parting with any of the spoons I've created. Usually, while the oil and wax are drying, I have enough time to enjoy the spoon, and I usually try to take some good pictures, too. There was one time when I sold a spoon very shortly after finishing it, and I did miss it a little. There was a simple solution, though: I made another similar spoon, and that appeased my need to enjoy the first spoon a little more. Now, this Portland Eisteddfod spoon is certainly one of the most special spoons I've had to part with, and I must say, I am excited to see it raffled off! There's not much time left to make your donation for your chances to win the spoon! I wonder how Dave feels when he has to part with a spoon that he loves...
- Laura
Laura brings up a very good point about 'letting go' of the spoons when they are completed. Sometimes it is a hard thing to watch them disappear into bubble wrap and cardboard as they are prepared for voyages to new homes, but it is always comforting to know how much they will be appreciated and to know that many will become treasured family heirlooms. Our lovespoons aren't like the gift-shop bric-a-brac that clutters the internet; they are deeply personal and very meaningful artworks which have tremendous relevance to the people who commission and receive them. As much as I might miss my lovespoons when they leave, I am proud to know that I have been granted permission to be part of my client's lives and I have made something that they will cherish.
The Eisteddfod spoon has given Laura and I the opportunity to work together and share our ideas and techniques. With it, we have helped a cause we believe in and we hope it will bring great pleasure to its lucky winner! So how could we feel badly about that?
If you haven't sent a couple of bucks to the Left Coast Eisteddfod, I urge you to get in under the wire and make sure you are in the running to win this spoon!
-Dave

Last year's spoon:


This year's spoon:

Tuesday, September 21, 2010

Time running out to win the Eisteddfod Spoon!!!

Bookmark and Share

Laura and I have finished the Left Coast Eisteddfod spoon for 2010 and it is now safe and sound in Portland OR awaiting its new owner. Remember that every donation to the LCE equals an opportunity to win this wonderful lovespoon!! Just so everyone can see where and how this spoon came about, we have done a 'review' posting with some select photos of the lovespoon carving process. We hope you'll enjoy this quick snapshot of the project and wish everyone who has donated the very best luck winning it!!

For me, the opportunity to collaborate with a wonderful carver like Laura has been tremendous. The opportunity to create this lovespoon with her and to see it evolve through its many initial ideas to the final lovely spoon has been a terrific change from my usual solitary way of carving. I would really like to thank Laura both for agreeing to carve this spoon with me and for the exceptional amount of time, energy and effort she gave to the project! The Left Coast Eisteddfod has been very fortunate to have her on board!

Cheers and good luck!! Dave

This really has been a fun project, and great opportunity! I couldn't have asked for a better person to partner with on a project like this - it's truly been a pleasure from beginning to end. Thanks, Dave, for bringing me along on this adventure! Now, let's review how this spoon came to be...
- Laura


Sunday, September 12, 2010

Finished!

Bookmark and Share

I am a little excited today because this week, I get to report that the spoon is finished. Last week, I'd begun the sanding. Through the week, I filed, and sanded, and sanded, and filed, and sanded, and sanded some more. Front, back, nooks, crannies.... lots of filing and sanding. I like to sand to rather a high polish before beginning the oil & wax process, so I sanded to 3200 grit. I don't know why I like to go to such a high grit - the sheen begins to appear at 600. But, I never seem to be able to stop there. Overkill, I am sure. Anyway, the spoon was very pretty, and quite whitish after all this sanding. I went over Dave's part, too, although his part was already to a nice sheen. Then, I put on the first coat of Danish oil (2nd coat for Dave's part), and all the pretty modeling and color of the grain began to appear. What a beautiful piece of wood this is! Seeing the first coat of oil is one of my favorite parts of the whole process. It's very dramatic for a few moments, and then, you sit there wondering - is it really almost done? Hmm. Pretty. :)
I followed with another 3 coats of oil over the next 2 days, drying about half a day between each coat. I also sanded once again before the last coat of oil. The spoon now has a very soft, polished finish. For the last couple days of the week, I let the oil finish drying. Then, this morning, it was time for the wax. Having sanded it so smooth, the wax polished up very nicely with a soft cloth. I use a natural beeswax polish by Briwax. I had to wax it in sections, so the wax wouldn't harden too much to polish off. Finally, though, I was done. Now, the spoon sits before me, all finished, and again, I wonder to myself - is it really done? But, I stare and stare at it, and yes, it is done.

Sunday, September 5, 2010

The finishing begins...

Bookmark and Share

Well, I believe I'm done with the rough carving of the rest of the spoon. That's not to say that all the carving is done, though - as I start the sanding, I've already found a few spots where I hadn't carved quite to the depth I'd intended. As I encounter those spots, I simply make a few more chips. From here on out, though, I think it will mostly be dust. Here's what the whole spoon looks like at the moment: . The part I did still isn't oiled, and having begun the sanding phase, the grain is up, so it probably looks a little washed out. But you can see the beginning of the overall look.

This week, there was a little bit of carving I still did, mostly finishing up the back, fine-tuning around the flowers and leaves, and still more work on the eagle. I was trying to make the beak hook a little more at the end, but I didn't have a lot of room left to make a hook. Exaggerating that hook at the end would have been nice - Dave reminded me that in a lot of the Northwest art, they do that, and I do think that's very effective, but I didn't have room on this eagle. I trust people will be able to recognize that this is an eagle, nonetheless. Another very eagle-y feature is that division between the white head feathers and the dark body feathers. Obviously, I won't be making different colors, so I tried to make it look like the head feathers overlap the body feathers. I am pretty satisfied with the effect here. More shallow relief. :)

Finally, I started sanding, or, to be more correct, filing. I began cleaning up quite a lot of nooks and crannies with my trusty needle files. I think there are two main advantages of needle files vs. sandpaper. Firstly, files work in the nooks and crannies because they are solid, not paper. Second, files don't leave grit that can dull your blades in case you carve any more. In the broader areas, though, where I'm sure I'm done carving, and I need to smooth away all my chisel marks, sandpaper does work fast and well. On most spoons, I tend to spend almost as much time sanding as I do carving. When there are lots of details like on this spoon, the filing and sanding is quite a challenge. So, Here is as far as I've come this week - mostly just on the front. I expect I will spend most or all of next week filing and sanding, getting to finer grits, preparing for the next step, which will be oil. I am VERY excited for the oil, as the shadows and grain really come alive with the oil.

It's nice to be getting into the final steps! Especially because Americymru's Left Coast Eisteddfod is just a few weeks away! This week, in Portland, the North American Festival of Wales is taking place. If you're in the area, or can get there, be sure to stop in at the Americymru table, along with all the other attractions. Remember, donations to the Left Coast Eisteddfod can be chances to win this spoon!

Sunday, August 29, 2010

Bit by bit...

Bookmark and Share


This week, I was able to spend several hours, picking away at all the various parts of the top of the spoon. I thought I'd focus on a few close-ups of some of those parts in this week's blog. I think I started with the flower. Last week, I'd begun carving the first three petals. This week, I've begun carving the next three, and the back. I think I have the petals to the depth I want - cupped around the trumpet of the daffodil. It's not as long as a typical daffodil trumpet, but it is definitely a trumpet now, and the thin walls of the trumpet still have some strength. I know I am a sucker for making things delicate, but only when it helps the design. Even I consider how protected delicate parts may be.

Later, I worked a bit on the eagle. I felt like he wasn't looking as "eagle-y" as he should. I think that furrowed brow is one of the defining features of an eagle, so I trimmed a bit from the top of the beak, and I think I managed to emphasise the furrowed brow now. What do you think? I also began to put some shape to the top edge of the wing. Now, most of the front was rough-carved, so I turned to the back. *sigh*.

I looked at the back, and thought to myself, "there is a lot of carving to do here!" Well, this time I started with the vines, then moved on to the knot. You've probably already noticed how my initial carving is quite rough, leaving a lot of flat planes. I think this is partly the way I carve, and partly a result of some limitations of the grain of the wood. I know we've talked about how this wood carves nicely - buttery. It doesn't do that in every direction, though. No wood does. With all the different parts of this spoon, the approach with even small tools can be limited, so I might need to go somewhat against the grain. Against the grain, or across the grain, you have to be very tender and careful not to let the wood chip or tear. I also have to be sure that after my cut, I don't let my tool go into another part next to the part I'm carving. Mostly, it takes small tools, a careful hand, and lots of time. I find myself resorting to my micro skew and chisel to get into some parts. . I think I am rambling a little bit, here... so I'll stop about all that. It'll all get cleaned up in later steps.

I worked a bit more on all the parts of the back - the vines, the back of the "frame", and then, finally, on to the back of the eagle. . I started rounding out the top, shaping the wrap-around wing a bit more, in relation to the body... I think It's looking a little more like an eagle from the back, too. I also started shaving away a bit more depth into the frame. The thing about the frame is, it's meant to be a stable, relatively flat part, with everything else wrapping around it. The frame itself shouldn't look like it's "weaving." It will have to, at least a little bit - that's the nature of shallow relief, but I need to make every effort to make it look like it's not weaving. It looks a little bumpy, but I am envisioning when things are smoothed out, and I think this shallow relief thing is coming into shape.

Well, that was everything you could have wanted to know, and probably lots more, about this week's progress. Hopefully next week I'll get beyond this rough stuff, and we'll REALLY see it starting to take shape!

Monday, August 23, 2010

A slow week...

Bookmark and Share


Well, this past week, I didn't have a lot of time. I was selling my spoons at a Civil War Reenactment over the weekend, so spent most of last week getting ready for that. I did, however, get to work a little on our Eisteddfod spoon. When I sat down to write this blog, though, I realized, I don't really have a lot to show this week. So, this may be a little short, but here's what I did...
Mostly, I spent a few hours making deeper cuts where needed on the front, and starting to work on my daffodil. I'm not sure if the little bit more depth shows up in this picture, but, I assure you, there's a little bit more depth. I also made some progress on the daffodil - if you look at a daffodil, you'll notice that the six petals overlap a bit. Since this is the front-facing daffodil, and daffodils have trumpets, I have to bring the center of the petals down to as low a depth as I can. So, the petals will end up forming sort of a cup, just like you'd see on a real daffodil. That's the plan, anyway. I'm using tiny chisels and gouges to get in there, so it is a slow process, and has quite a bit more to come.

Then, I felt like a change, so I started cutting the lines into the back. . I don't think the left part of the frame looks right in the back, so I will re-draw that. I can do that, because the eagle wraps around the frame, so the frame will have to be carved to depth, which will erase the previous line I drew and carved. As you see, it's the same process, piece by piece. There are still lots of chips to take away. I guess that's what the process is all about.... take away the chips until they are all gone and what's left is the spoon. :) So, while I'm removing chips, you might consider making a donation to the Left Coast Eisteddfod to get some chances to win the finished spoon!

Sunday, August 15, 2010

Laura's turn!

Bookmark and Share

Well, when the spoon arrived in the mail, my husband and I were on our way out. So, naturally, my husband said, "Well? let's open it up!" So, we carefully cut tape and removed layers and layers of bubble wrap, to arrive at this lovely spoon. I held it in my hands, and we both admired Dave's carving for a few minutes, and then we went on our way, only a little behind schedule. :)

One of the things about the spoon, with its lovely gentle arc near the bowls, and its convex back, setting it on a flat surface would leave it vulnerable to breaking with any pressure placed on its front... pressure like, oh, I don't know... carving? So, I got out a piece of squishy cloth, folded up, and placed it underneath for support and stability. I'll use that fabric any time I'm carving it on a table. Now that I see the spoon, it is bigger than most of my spoons have been, but it's not SO big. I can carve at a small portable table I have. My workbench still isn't finished, and it looks like I won't need it, after all. My dogs will be happy that I will stay in the room with them.

But I digress.... For the first day or so, I was studying the spoon, trying to figure out any challenges and such. What is the major immediate challenge? Where to begin! Seeing as how I'd never worked on a spoon that someone else had already partially completed, I was a little intimidated about beginning. I decided to take the harmless approach, and start by drawing out my lines on the back of the spoon. After about another day, my longing to see how the wood carves kicked in, and I began carving grooves along all the lines on the front, and beginning to remove the paper wherever I could. 
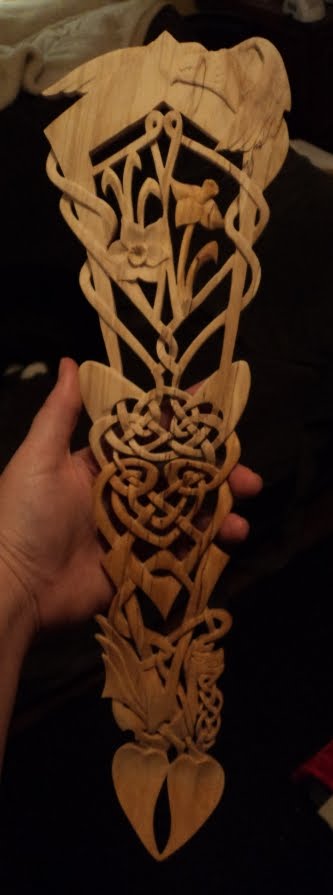
. That's how I generally start - the grooves acting like stop cuts so I don't accidentally chip the wood with my shallow cuts. Then, I start with shallow carving of depth, much like Dave. But, again - where to start?! I usually start with parts that intimidate me more. In this case, there are probably two main parts that fit that description: the eagle, and Dave's knotwork. I kind of like knotwork, though, so that's where I started. And, incidentally, I am in love with this birch! It does have a buttery feel, just as Dave promised, but it is still strong, and not brittle. It reminds me of the first piece of cherry I carved (which was much softer than the last piece of cherry I carved!) Again, I digress.... so, I started with shallow cuts in the knotwork, and then went a little deeper, and moved along to the vines and other parts of the spoon.

Then, eventually, I got brave, and began to attack the eagle. One thing that will be especially challenging about the eagle is showing enough depth to make it look like the eagle is wrapped around the upper right part of the spoon, without actually being carved in the round. I usually carve more "in the round", but in this case, that would have resulted in a very heavy eagle perched upon the spoon, which wouldn't feel right at all. Instead, I will be carving the eagle in shallow relief - suggesting depth where there isn't really much depth. Just like everything else, though, I start with very shallow cuts. There's a lot of depth to show in quite a small amount of wood, so I'm especially careful to work on all parts of it, just a little at a time. There's very little margin for error on this eagle, more than any other part I'm doing. You can't see much in these pictures, since I'm still keeping a little on the shallow side, but hopefully you can see it starting to take shape.

Well, that's as far as I am after my first few days with the spoon. I suspect I work at a bit slower speed than Dave, so progress may be harder to see. I hope you're able to see it taking shape, though! As the weeks go by, the Left Coast Eisteddfod is nearing! Remember, each dollar donated can equal a chance at winning the spoon!

Sunday, August 8, 2010

THIS is a lovespoon!!!

Bookmark and Share

With the Left Coast Eisteddfod lovespoon somewhere in the air over the continental USA, I thought I would use the time before Laura gets underway to put out a quick blog on this lovespoon I have just finished carving.
This spoon is the real deal! It would be hard to find a spoon with more love and depth than this one and it has been an honour and a pleasure to carve it. Emotionally, it has also been one of the hardest spoons I have ever done.
This spoon was commissioned by my friend D, who was in the final stages of a hard fight with cancer. It was a fight she knew she wasn't going to win, so she organized her passing with single-minded focus and did all she could to make life easier for her family and friends after she was gone. One of the things she did was to commission this spoon for one of her two best friends. If we are lucky in life, we are successful and happy...if we are really fortunate, we have good friends and a close family and D had both in spades!
For me it was crucial that this spoon focused on the depth of feeling that two friends can have for one another and the remarkable bonding a good friendship brings; a sentiment D very much shared. She wanted something of both herself and her friend M to be present in the spoon design, so we chose flowers to represent them. Among the flowers are a pair of hearts whose meaning needs no elaboration! Beneath the flower a circular ring (symbolizing eternity) is broken by D's all too early passing, but the circle is held together by the eternal Celtic knot within. The written message is reinforced by this knotwork to symbolize a friendship never forgotten.
One of D's top wishes for the spoon was that the sun would be present and the spoon would feel positive, light and affirming. Although the spoon will be given at a time of terrible grief, it's sunny disposition is a direct reflection of D's own bright personality. As the rays emanate from the distant sun, they seem to warm the spoon while also drawing the flowers upward.
The final section of the bowl is the twin heart-shaped bowls which gently merge the two separate handles, just as a good friendship can merge two very different personalities. The knotwork reinforces the idea of eternity and the stems are used as a symbol for the growth of a relationship now cut tragically short.

It was tough-going carving this wonderful spoon. But even though I feel heart-broken at the loss of such a beautiful friend, I also feel tremendous pride that D's powerful message of love and affection can be passed along through a simple wood carving. THIS is what lovespoons are all about and why I love doing them!