Monday, August 20, 2012

Nooks and crannies...


Bookmark and Share
Last time, I  was ready to begin sanding. Lots of sanding....
I usually start at around 80 or 100 grit - especially for the larger areas like the bowl. This first grit of sanding inevitably reveals little connections and overlaps that I end up wanting to carve to refine a little further, again, this time more than usual. I think I even made 4 or 5 new piercings, not to mention sharpening lots of little corners, and maybe even a little slight re-shaping here and there. With all the nooks and crannies, the needle files were a big help this time, too. So, I find that the first pass probably takes 4 or 5x as long as any other grit. I assume, also that the reason for that is because I don't carve nearly as cleanly as someone like Dave. That means more shape refining in my first pass. It's probably been years since Dave's had to deal with that issue.


Next came 180, 220, 400, 600 and 800. In these pictures, it was at 800, and still drying the first time. You can see, the scratches are pretty much gone, but the surface still looks pretty rough after wetting it this first time. Through these first several grits, my main focus is removing scratches from the previous grit, or from the carving tools as well as I can. By 600 or 800, it starts to get a sheen, and it mostly stops creating dust. At this point, I like to wet down the spoon with water to bring up the fibers of the wood (I just pour water all over it). Then, I repeat 800, wet it again and see if it roughs up any more. Once it doesn't rough up after wetting it, then I move on to the remaining grits.


So - it looks rough here, because those little fibers are all standing up, but it wasn't long now, before I was through all the rest of the grits (about 9 more). Probably only 3 hours or so.
At this point, I think of it more like polishing than sanding, so I don't feel the need to get all the way into every nook and cranny with these very high grits. Of course, that's why these higher grits go so quickly. There's no more dust, and no more scratches, but if I can see a difference in the polish with each grit, then I keep going until either the polish stops improving, or I run out of grits. With most of these harder woods, that's usually 12,000.
Someone said something about video... so, I figured I'd give it a try. I don't think I'm any good at it - hope you don't get motion sickness watching it! Anyway, here it is, with the sanding all done...


Last thing - maybe a coat of oil to protect it a bit... Earlier, I was thinking it might be better to just leave it sanded, not oiled, but after seeing how dirty it got from handling it, I changed my mind, and decided a coat of oil would be a good idea. Also, I finished it on a Saturday, so I couldn't mail it until Monday anyway, so why not?

Here are some pictures against a medium-color background, just for a change of pace.


Well, time for me to part with this thing. That was really really fun! Thanks, Dave & friends at Americymru for letting me be a part of this! I can't wait to see Dave bring the top alive, and pull the whole thing together - It's definitely becoming reality. My only regret is that it took me so long. Sorry, Dave! Don't forget to get your tickets - you really won't want to miss your chance at this one!

Next, packaging it so it won't break in the mail, and then we all get to see Dave make it into something really special!

Monday, August 13, 2012

Completing carving of "part A"


Bookmark and Share

Well, time for the rest of my section, up above the cages.
Here, I was looking to check those vines coming up from the cages - even while I was carving the cages, I had to think about not only the depth level of those vines that were the cage, and following it up each of those vines, but also the overall profile of the spoon as it flattened out, and reached towards the top. I wanted to curve down the sides a little, to help with the transition of the thick cages to the flatness of the rest of the handle, but also keep the lower part of the handle a little nearer to the front plane than higher up. This goes back to that challenge of making the vines look and behave like vines. Vines wouldn't bend back and forth the way the ropes in knotwork do - they might bend around something, but it's a more gradual bend. So, trying to do that as much as possible, there was quite a lot of thought that went into any part that reached into or around another part. I think of the bends in knotwork as being completely flexible, because there's been human intervention, bending the ropes in a knot. Vines, on the other hand, grow into the path of least resistance - they don't usually choose a path that follows the perimeter around another object/vine (well, sometimes they do, and I included one of those in that heart in the middle, but that's a different thing).  So that's what I was thinking, anyway... just in case you wondered. ;) I don't know how well I succeeded with carving the vines to look "natural," but at least that was the intent.

Anyway - I was thinking the cages would have been the hardest part. I was wrong. I seriously under-estimated something. I have carved my share of fretwork before - even tight fretwork like this - but there were two key differences this time: 1) there was a LOT of it, in a relatively small space, and 2) it was mostly pretty irregular, not in repeating patterns. While there was  no single element that seemed so unusual, having a whole bunch of detail all crammed into a relatively small area added a substantial challenge I had definitely overlooked.  I actually felt the need to keep a print-out of the design with me while I was carving, just for reference.

 However, the really hard part came along when I'd flip it to carve the back. I found it incredibly difficult to keep track of where I was, and keep the exact part I was carving in my mind's eye. I think it was the irregularity that made it so difficult, because once I marked out the over/unders on one of the little knots surrounding the tree, the rest weren't really any trouble.  In hindsight, if I ever do something like this again, I'll simply draw out the back, too, so I have it for reference. Why I didn't stop and do that this time - I couldn't tell you. But had I done it, that probably would have spared me many hours of staring and thinking. :) The fretwork was so tight, I couldn't see the over-under of the other side from the back, so I had to think it through from the front-side print-out I had. This was even after I'd scooped away as much of the excess depth as I was comfortable removing. I guess I usually have quite a lot more open space involved in my fretwork. I thought that was just my design sense, but now I see there was an added benefit I didn't even realize before!
I think the irregularity was the worst part. At least in those knots surrounding the medallion, once I found my way around one, from the back, all the others fit together the same way. In hindsight, I'd have spared myself from a lot of confusion on the back if I'd just stopped and drawn out the back on a piece of paper, so I could have it as reference, just like I had the front drawing as reference. I should have stopped to do that, but I suppose I couldn't see the forest, for the trees! I know for next time, though. :)

Oh, and I held off on carving that leaf sticking off the side there, higher-up on the handle, so that I wouldn't break it off while I was carving up there. I'd carved the leaves sticking out near the bowl, but I'd already gotten used to keeping them safe, so they were pretty much out of the way now. 

The plan was that I'd carve probably up to somewhere around the tips of the tongue and tail, and I'd probably get into the knots that the other parts of my carving would touch on the lower part of the medallion. As I was carving away the back, I realized that those vines that reach most of the length of the spoon (into Dave's section) could end up at a variety of depths, depending on what Dave wanted to do. So, near where those met Dave's section, I didn't completely carve them, so I could leave him some flexibility in his placement of those. 

In the same way, I wanted to carve some of those little knots next to the medallion, since the other stuff I was carving next to them touched them, and they sort of inter-acted. Also, the part where the words will be seemed like a good stopping point, since I could keep the back flat pretty much where Dave will be sawing, too, and its shape is relatively straightforward.

So, eventually, I decided enough was enough, and it was time to move on to sanding! I inevitably find little pieces that I think need to be thinner, or corners that need to be sharper, etc., when I'm sanding, so there'll be a little more carving (even though that's bad for my tools) while I'm sanding. But, for the most part, here it is, finally - "carving part a" complete. Yay!


Well, that took - oh... about 3x as long as I expected. Hmm. So much for getting better at estimating! Ahh, the dangers of lack of experience...... Sorry, Dave! One day, you'll get your chance at it!!!

Next - SANDING!

Thursday, August 2, 2012

Carving fun cages


Bookmark and Share 
Time for some carving! But where to begin....?  Well, sometimes that's a little bit of a dilemma for me, but this time, I actually had put some thought into it while I was still working on the design. This time, I'd start at the bottom: the bowl. Then I'll work my way up. I've mentioned before how concerned I have been about the spoon holding up around these frail little cages, so I want to get all that extra pressure from carving away all that excess wood around and inside the bowl before I get started on the cages.

I started with the back/exterior of the bowl. Now, after a few hours' stretch, something usually happens that makes me chuckle. I thought it might make for a good opening picture for this post....
 and here's actually the back of the bowl...


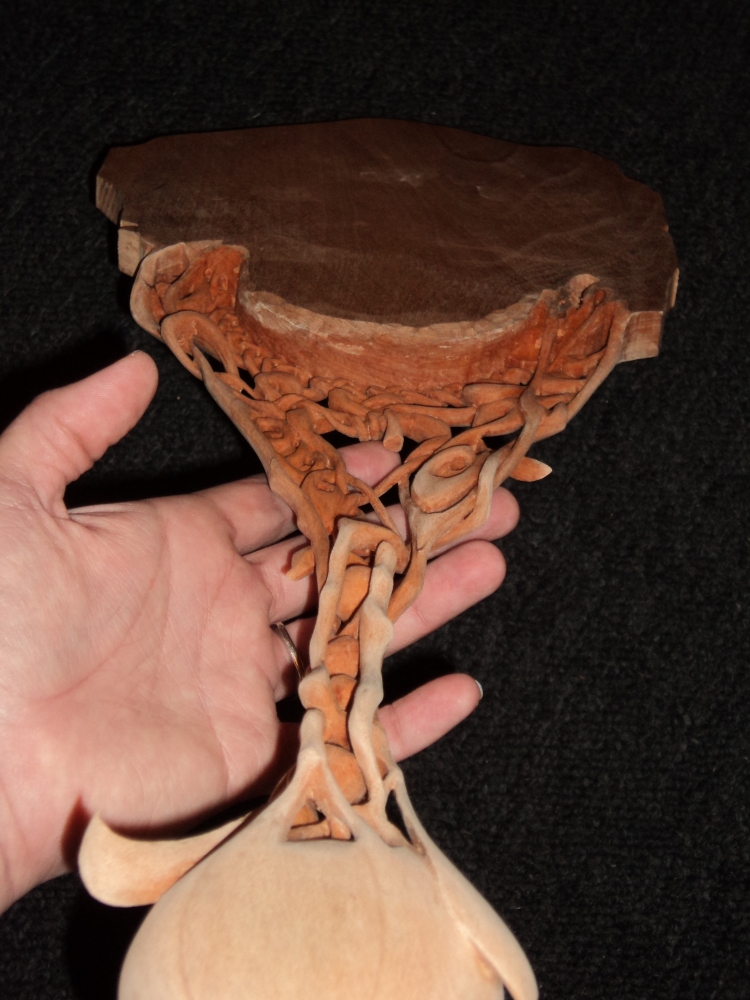
Anyway, after the dog returned to his usual spot on the back of the sofa, I spent a few more hours removing the interior of the bowl. This is a pretty simple task (certainly the simplest feature on this spoon), but labor and time intensive. And, the bowl is an important part, too - it deserves careful attention. People always ask me how long it takes to make spoons... so, I think it took around 8 hours of carving to get to this point, just to give you an idea. Yeah - cherry is kinda hard.

 
One thing I learn in the process of carving the bowl is what this particular piece of cherry is like. Now, I know I pushed for cherry because it's stronger than some other woods, but another reason was that cherry never seems to vary as much in hardness or other carving characteristics as other woods. So, naturally, as I carved the bowl, I discovered that this particular piece of cherry seems to be at least as hard as any cherry I've ever used, and it also seems to be a little more fussy, and likely to tear with certain approaches to the grain. It still carved better than a lot of woods, though, so I do still think it was a good choice.

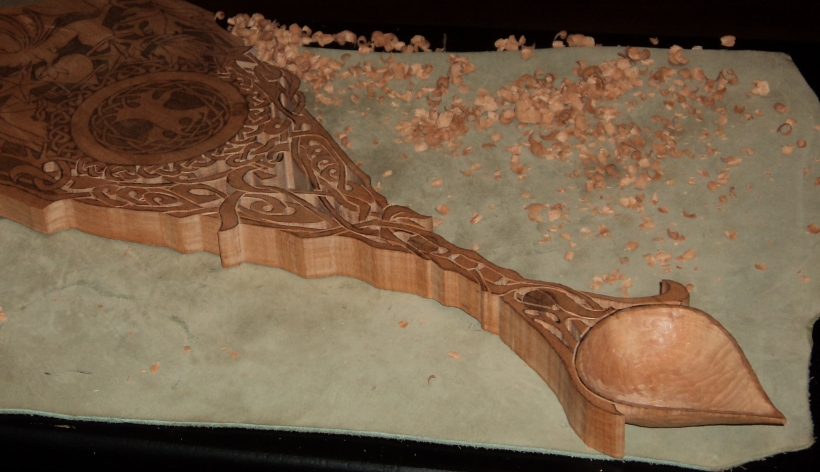
Please note the size of those chips up there, too.... on most spoons, those would be pretty normal-sized. On this one, however, we won't see many more nice, big chips like that. Normally, for the rest of the spoon, I would use my 8mm #5 gouge for 80-90% of the work. This time, however, I got to use that "big" 8mm gouge for maybe 5% of the carving, if that. I'd end up using mostly my 3mm #5 gouge. Lots of hard-to-reach areas on this one, where the 8mm gouge just wouldn't fit. To some extent, I anticipated this, but I'll give you, I didn't effectively factor it into my estimate for how long all the carving would take. 3mm vs 8mm - well, you do the math. :) The other big learning experience for me this time: all these different, interweaving vines & knots and third-dimension decisions (that I didn't draw out - I usually make those up as I go) aren't so bad each by itself, but having them all so close together makes a big difference. My spoons are usually so much simpler, the mid-carving thought process doesn't usually take up that much time. This time, however, it may have been one of the biggest factors. It's so easy to get lost in all that detail, especially when you're flipping from front to back, and sides, and the relationships between all those details. I want vines to act like vines, and knots to act like knots... etc.

Well... that was a lot of words. So - here are a lot of pictures, as the cages developed. Still, from bottom to top...

Note the size of the chips.... see what I mean? That's all I'd see for a while...
Oh - and you may notice the light is different here, too - that's because these were taken where I normally carve once a week:


Next to the river. :) Nice. Then back to my usual arm-chair, and more work on the cages...

 Getting into the back.... and now lots of thinking, checking where I am about to carve, following vines through the cages and up the handle.... into the bowl... etc......
And finally, freeing the ball in the first cage... see it in there? now I have a very-large-handled rattle. Ha. This cage was awfully fun. Interestingly, while it took a lot of thought and very careful concentration throughout the carving process, there was a trade-off. One challenge missing from this cage that is often important in other cages - there are no straight lines, and no need to make one part look exactly like another part. Straight lines and symmetry are tricky. However, while I don't have to worry much about symmetry - I do have to think about balance, and making the roots/vines actually look like roots or vines. They are also not as much fun as this organic stuff. So - more fun through the rest of the cages...


Note - I'm having to start working a little higher up the handle to make sure I'm putting everything in the right place - again, keeping that "big picture" view, and overall balance.


A note about caged balls: they are still just a matter of carving away everything that isn't a ball or a cage. At this point, I've freed the ball in the upper-most cage, too. But, I think the biggest challenge with them (especially when you don't have to worry about symmetry) is getting to clean up the inside of the cages, and shaping the ball. I like to try to get the ball as round and smooth as I can before I free it. That usually requires pretty small tools, and certainly very small chips. These cages were all actually mostly a little bit larger and more accessible than I'm used to - the ones I've done before, I put near another element, blocking access on one side, and that sort of thing. Still - with all those vines around them - especially in that lower cage, it was a little tough to see whether the ball was actually round. Then, once I DID free each ball, my fingers didn't quite fit in there, so it's really tricky to secure it for further carving. Eventually, I came up with a solution to that problem, but I'll explain that another time.

So, I eventually freed the remaining balls, and got to a point where I felt like I was finished with the cages. Just a few more pictures of the cages to leave you with, for now. Next time, we can see what happens above the cages. Meanwhile - I REALLY hope you'll consider making a donation to help support the West Coast Eisteddfod (there's a "Donate" button at the right on this page), to get your chances to win this spoon, and encourage the making of more, in future years!


 Oh - one more note - I'm pretty certain that I had something different in mind for the third-dimension of the cages, that would have had more connections from vine to vine (more like what's above the lowest cage). I know my original plan wasn't as open as this. I don't remember exactly what that original plan was, so I just made it up as I carved, knowing exactly how strong things actually were now, and apparently, this arrangement is what struck my fancy while I carved.