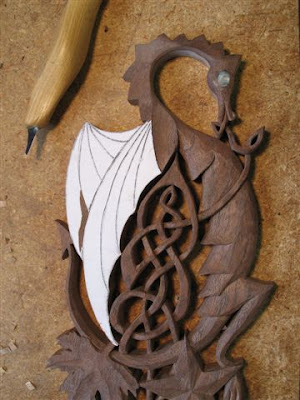
This week I am going to work on the dragon's head. I hope to get it nicely shaped with a good 'flow'. I don't want it to look particularly ferocious and offputting, but by the same token, I don't want it to look like Barney or something cartooney. I've settled on a fairly neutral mouth with the tongue becoming the start of the Celtic knot, but at the moment I am more interested in shaping a nice form to the head and neck.

As you can see, I have started to rough out the curve of the chest to where it meets the tongue and I have put some shape to the neck by tapering it back a bit. I have also started to shape the face a bit and will adjust the tongue so that the 'overs and unders' of the Celtic knotwork come out properly.

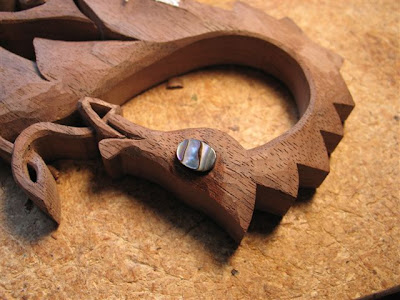
This shows more clearly how I am tapering the neck back to form the three dimensional shape and to find the spinal ridge. I've also started to shape the mouth a bit so that I can form the last bit of knotwork just below the mouth. One thing that I really have to watch at this point is how the wings will join the body at the shoulder region. It's easy to take to much off while shaping the chest and neck and be left with too little material for a nice transitional area to the wings.
 I had originally planned to carve the dragon's eye directly from the walnut and have it be fairly subdued, but he's a dragon not a shrinking violet!! I have now decided that an inlay of abalone shell will give his eyes a brilliant flash when the spoon is viewed from different angles. I don't usually do too much inlay or staining on my spoons, preferring to keep the wood as the focus of attention, but sometimes a judiciously applied inlay can really add a splash of colour and can make a marvelous focal point on a design. To inlay abalone, I shape the piece I want to use then spot glue it to the piece. With the glue cured, I trace around the edge of the inlay with a razor knife then pop the inlay back off. Staying inside the scribed line, I excavate a flat area which is almost the depth of the shell. I like to leave a tiny bit proud of the surface so that I can dome it a bit and shape it flush to the surface. A note on shell inlays: The dust made by sanding or shaping abalone or mother-or-pearl is reputed to be highly carcenogenic. Always wear a dust mask and clean up the dust with a damp cloth if you decide to try some inlaying of your own! The stuff also really stinks, so I generally do mine outside in a breezy area.
 With the inlay in and lightly domed (as well as being taken down flush with the surrounding wood), I can concentrate on giving the head and neck some shape.
To get a smooth and fair curve, I use a wood file to do the shaping at this point. I really do try to avoid sanding for as long as possible so that I don't embed sanding grit into the piece and cause damage to my blades should I need to cut more later. Here you can see I've also started to shape up the nostril area and give some form to the knotwork.
 Here he is so far. Taking shape and looking fine; as the best class of dragons should! We've been getting some great name suggestions for him and I encourage you to send in your suggestion if you haven't already. Although there's ****all for a prize, you do get the glory of being the one who names him We're going to close off the entries next weekend, so act quickly!! The great folks at Americymru have decided that the democratic way to select the winner is to run a poll of their 5 'best picks' and let you vote on the ultimate winner. In the meantime, I've stopped calling him Dafydd in preparation for the 'people's choice' decision.
I thought that was his fiery breath!
ReplyDeleteFiery breath!! Why not?? I can't think of a single good reason why it isn't just as likely to be fire as his tongue. I just wish I could take credit for the idea!!
ReplyDeleteHe's looking great, David. I like the way you did the scales on his back. The abalone eye was the right thing to do. How do you shape and dome the abalone?
ReplyDeleteBob
Hi Bob
ReplyDeleteTo shape abalone, I use files. I've got a range of small and needle nose sized files that work really well. To dome it, leave about 1/2 the thickness of the abalone piece proud of the work surface then fair it down toward the edges from a central high spot. Once shaped it can be sanded with fine papers (150 and up)
Don't forget to wear a mask!!
Cheers
Dave